dommuss

dommuss
If you need help with dommuss, please write to info@dommuss.com and we will get back to you as soon as possible. In any case, we leave you with the most frequently asked questions about dommuss if they can help you solve your query.
Dommuss is the free app (available for Android or Iphone) that helps you organize your daily life as a family, as a couple or as a group.
A private space where you can share calendar, shopping lists, weekly menu, to-do lists, notes, contacts, and photos.
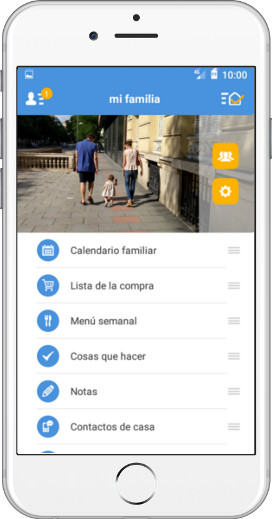
Thanks to dommuss it will be easier to remember the appointment with the doctor, the birthday party that your little son has on Friday or the wedding that you have in 5 weeks.
When you go to the supermarket, you won't forget what to buy and you'll always have your plumber's phone handy for when the unexpected emergency arises.
With dommuss, free your mind, share out tasks and avoid messes :)
Dommuss is an app that includes many applications: a calendar, a shopping list, a weekly menu module, contacts, etc.
You can take a look to all the functionalities that Dommuss has and the detail of what each one offers, in this section.

We are already thinking about new features to incorporate in the future, we accept suggestions!
You can access dommuss from your mobile phone as long as your device has the operating system iOS 8.0 or later or Android 4.1 or later.
Dommuss has a very powerful free version. To start using it, all you have to do is sign up. You can do it through the app you'll find in the App Store or in Google Play
Once you have installed it, click on "I AM NEW" and complete your registration, it will take you a minute and then you'll save many later on :).
It's that easy. You will already be registered and will enter your dommuss, that is, the private space to share with your family, partner or group.
There you'll find a calendar, a shopping list, a module for writing down the weekly lunch and dinner menu, a to-do list, a note module, a contact list (phone numbers, e-mails, addresses and web addresses) and a photo storage space.
These are the modules that we have configured to make it easier for you to start using the app but you can modify or delete themfreely if you don't need them.
Moreover, if you are an advanced and active Dommuss PLUS user, you will enjoy a fully customizable space in which to create the modules that you find most useful..
The second step once you are in your dommuss is to invite the members you want to be part of your private space so that you can start sharing.
You can change the name and photo of your Dommuss whenever you want if you are the administrator.
On the main screen of the dommuss, tap on the icon next to the picture to access the options of that Dommuss. A menu of options will open.
To change the photo just click on the photo icon, select if you want to use one from your gallery or make one on the spot, it couldn't be faster!
To change the name, click on the box with the current name of the Dommuss. All you have to do is enter the new name you want to give the dommuss.
Once you've made the changes you wanted, all you have to do is Save.
If you are an advanced user,you can subscribe to Dommuss PLUS and access all the advantages it offers you.
With Dommuss PLUS you can customize your Dommuss, create all the content you want, whether new modules or even new Dommuss or spaces to share and much more.
Discover everything Dommuss PLUS has to offer here!
Dommuss PLUS is available on an annual subscription basis. The cost depends on the number of members you want to do PLUS. It is 14.99 € for the first member and 4 € for each additional member.
Less than it costs you to order a couple of pizzas for dinner one day because you forgot what you had to buy :)
Very simple. In the app, click on the left side menu and click on the Dommuss PLUS button.
You can choose to try it for free for 2 weeks on the left button or register directly on the right button.
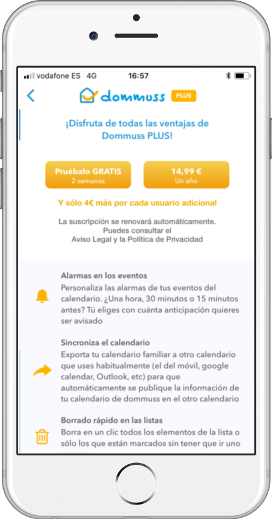
On the next screen you decide how many people you want the subscription for. It can be only for you or for the members you want of those who are part of your Dommuss.
The first user costs 14.99 € per year and the following ones only 4 € per year, so it's a good time to subscribe to the rest of your group members as well.
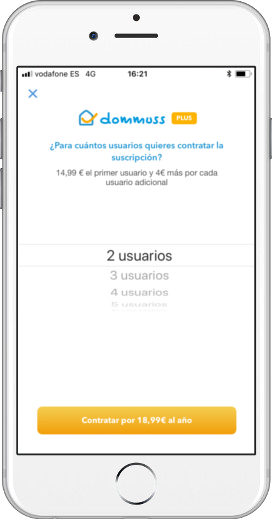
Once you have decided on the users, all you have to do is click on the "Subscribe" button.
You will then be able to manage which members you want to assign as PLUS users.
To invite new members just follow these steps:
In the main screen of the dommuss, click on the button with the little people icon.
Once you are on the members screen, you must click on the "Add members" button. A menu with two options will then be displayed.
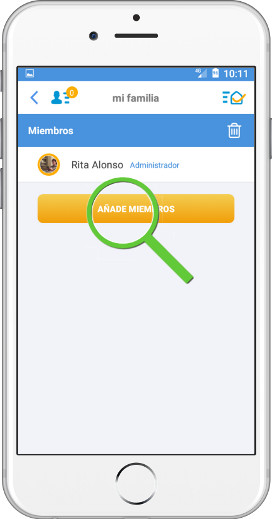
You can send the invitation directly to the person you want to invite through any of the apps you have installed on your phone (whatsapp, mail, msm message, etc).
The person you invite will receive the message with a link that will take them to download the app so that they can register (they will automatically enter your shared space) or will open the Dommuss app if they have already downloaded it.
Good news, there's no limit. You can include as many people as you want in your family or group.
Unsubscribing members is also very simple: Just as we did to invite members, on the main screen of the dommuss, click on the people button next to the photo
Click on the trash can at the top right.
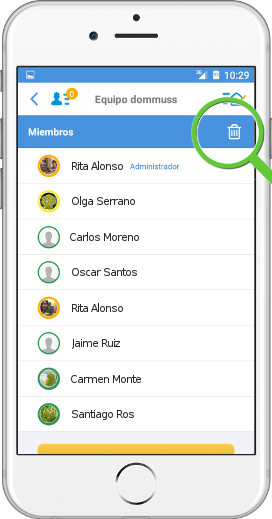
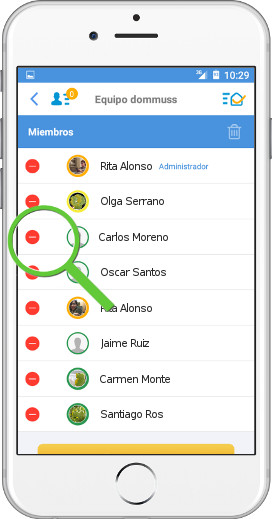
By clicking on the red icon to the left of each member, you can delete those you consider appropriate.
If you are a user of the free version, you have access to a calendar, a shopping list, a weekly menu module, a list, a note module, a contact list and a photo directory. You can only create a module if you have previously deleted it.
If you are a PLUS user you will enjoy a fully modular and therefore highly customizable dommuss. You can create as many modules as you want and it's easy to do.
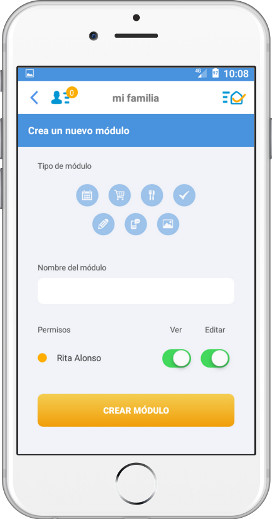
First you have to click on "Create a new module" that appears at the end of the home screen, below all the modules.
When you open the menu you have to choose the type of module you want to create (a calendar, a list, etc.), the name you want to give to the new module and the reading and/or editing permissions you want to give to the members. All that remains now is to click on "Create module".
Yes, if you are a PLUS user. Just click on the three horizontal stripes icon that appears to the right of each module in the home page and move the module to wherever you want.
It's very simple. Inside the module, click on the Settings icon that appears in the module menu.
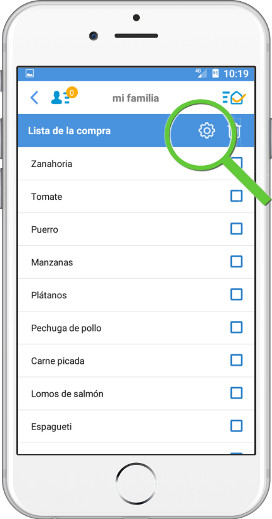
On this screen, click on the "Delete" button and it’s gone
Inside the module, click on the Settings icon that appears in the module menu.

A menu will then be displayed where you can enter the new name for the module.
Just click on "Save changes" and the module will have changed its name.
Yes. Dommuss has a powerful permission system. For each of the modules you have, be it calendar, lists, notes, contacts or photos, you can decide who can view and/or edit it.
That is, you can share the shopping list with everyone (including the person who helps you at home) but only with your partner; you can give your children permission to read but no editing capability, or you can even create a private module that only you can see.
You can choose permissions when creating a new module. Once you have chosen the name and type of module, you can set the permissions.
You can also change the permissions of a module that is already created. To do this, you have to click on the Settings icon on the module.

And once inside, at the end of it all, you can also edit the permissions.
Easy, isn't it?!
On the main page of the dommuss, click on "Calendar".
Once inside the module, click on the "+" button at the top right to create a new event or click on an event already created to edit it.
A menu will then open to enter the new appointment data. Once this is done, click on the "Repeat" option, which is set to "Never" by default to change it to the desired frequency: every day, every week, every month or every year.
The repeat menu will then be displayed. All that is left to do now is to choose thedesired periodicity and end date and click on "Save".
Yes, it's very easy. On the main page of the dommuss, click on "Calendar".
Once inside the module, click on the "+" button at the top right to create a new event or click on an event already created to edit it.
A menu will then open to enter the new appointment data. Once this is done, click on the "Alarm" option, which is set to "No alarm" by default, to select how far in advance you want to be notified. If you are not a PLUS user, you can only set alarms one hour in advance. If you are a PLUS user you can decide if you prefer to be notified 15 minutes, half an hour, one hour or two hours in advance.
Just click on "Save".
Yes, if you are a PLUS user In fact, exporting the calendar and synchronizing it with other calendars you use regularly (such as the one on your phone, at work, etc.) is super useful because you can see family events on your regular calendar (the one you use on your phone) without always having to log in to Dommuss to check if a certain date is free.
Once you export the Dommuss calendar, it will synchronize with your regular calendar and every time you include an event in Dommuss, it will also appear in your other calendar.
To export the dommuss calendar to your own phone, from the dommuss homepage, click on "Calendar".
When the menu opens, click on the export arrow at the top right.
The process will depend on the devices and calendars you use. Below you will find step by step information on how to export your Dommuss calendar to your Iphone, Mac, google calendar or Outlook calendar.
Apart from these, which are the most common, most calendar managers will give you the option to include it. Look for the option to import with URL or subscribe.
And, of course, if you have any questions, don't hesitate to write to us at -info@dommuss.com
On iPhone, the process is extremely simple. When you click on the export arrow, you will get an "Export Calendar" message. This may take a few seconds. Just click on "OK" and your calendar will automatically appear on your mobile phone.
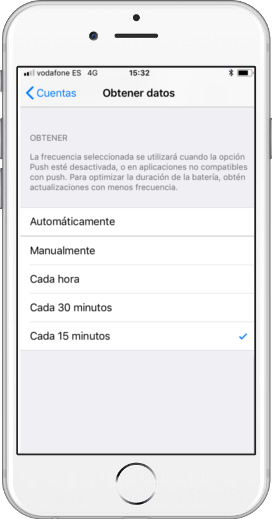
To synchronize it more frequentlyand keep it up to date go to
Settings > Accounts and passwords > Get data.
Check that the Calendar has the "Get" option selected and at the bottom of that menu, in the Get section, select "Every 15 minutes".
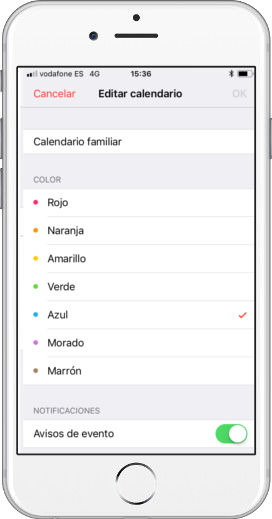
You can change the title and color of the calendar. On your Iphone go to the Calendar application. Click on "Calendars" in the menu below.
Click on the calendar information button you want to change the name or color and edit it to your liking.
If you use a Mac, you can also include your Dommuss calendar in your computer calendar:
First you have to get the calendar url.
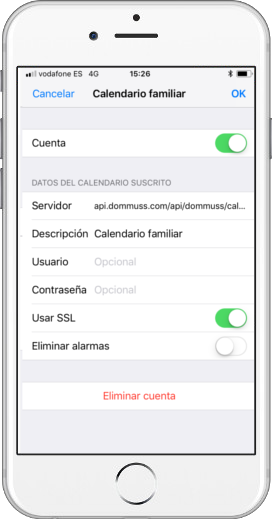
Send it to yourself by email to have it on your mac.
Then you have to include it in the mac.
Most importantly, select to update the information every 5 minutes. That way you can make sure it's always in sync.
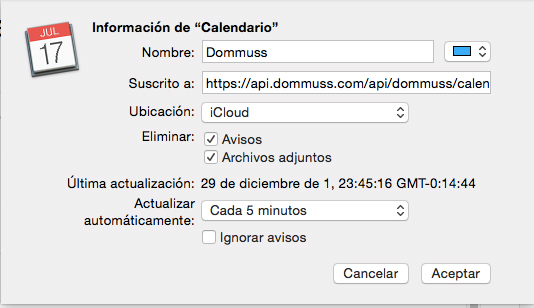
If you use iCloud, you can place it there so that it is also visible on your mobile phone. In this case it is better to delete the iphone so that it does not duplicate.
PTo delete the calendar from your iPhone, go to your iPhone, tap Settings > Accounts and Passwords > Subscribed Calendars.
Click on the calendar you are interested in and on that same screen, at the bottom of the screen, you have a button to delete it.
Open the Dommuss calendar and click on the export arrow to the right of the calendar menu, next to the setting nut and the more to add.
If you use an Android phone, the url of your calendar is automatically copied. If you want to have it available for export to several different calendars, paste it into a note. It should be something like this:
webcal:///www.dommuss.com/dommus/xxxxxx/calendar-feed/xxxxxx
If you use an Iphone phone, the url will be automatically copied to your iphone.
Go to Settings > Accounts and Passwords > Subscribed Calendars. Click on the calendar you are interested in and copy the url that appears in the Server field. It'll be something like this:
api/dommuss.com/api/dommuss/calendar/xxxxxxxxx.ics.
Oh, that's great! You already have the URL of the dommuss calendar, send it to yourself by email to have it also available on your computer.
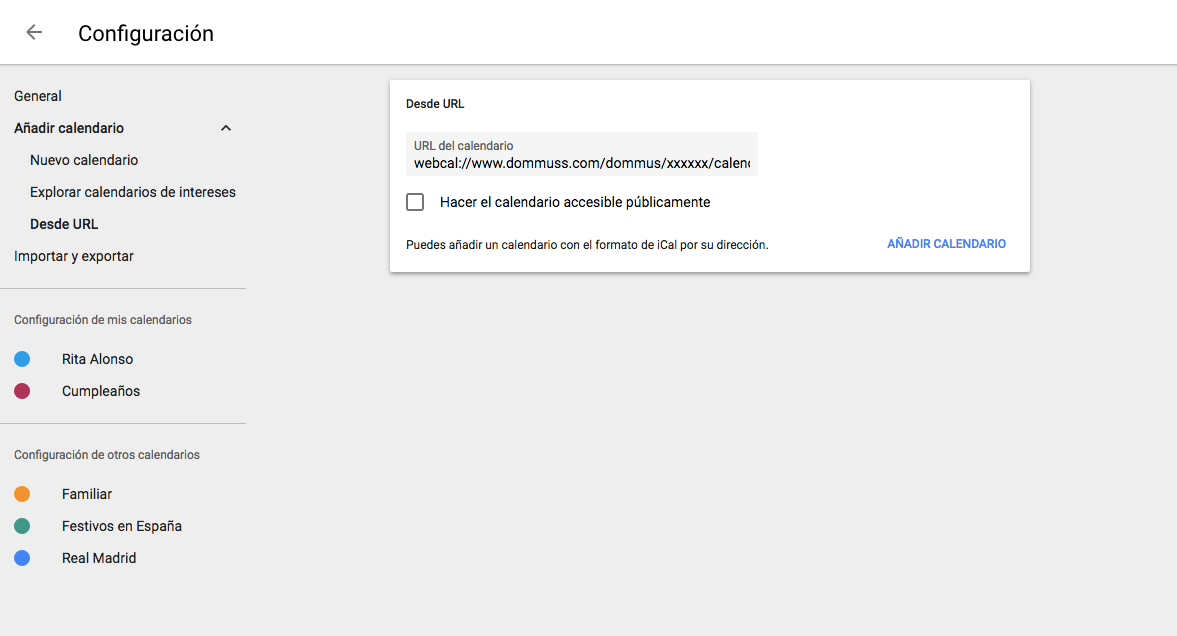
Note: Due to Google Calendar policies, changes may take up to 12/24 hours to take effect in your Google Calendar.
Open the Dommuss calendar and click on the export arrow to the right of the calendar menu, next to the setting nut and the more to add.
If you use an Android phone. the url of your calendar is automatically copied. If you want to have it available for export to several different calendars, paste it into a note. It should be something like this:
webcal://www.dommuss.com/dommus/xxxxxx/calendar-feed/xxxxxx
If you use an Iphone phone, the url will be automatically copied to your iphone. Go to Settings > Accounts and Passwords > Subscribed Calendars. Click on the calendar you are interested in and copy the url that appears in the Server field. It'll be something like this:
api/dommuss.com/api/dommuss/calendar/xxxxxxxxx.ics.
Oh, that's great! You already have the URL of the dommuss calendar, send it to yourself by email to have it also available on your computer.
For OUTLOOK ONLINE:
Open the Outlook.com calendar from a computer's browser, as the mobile version does not include this feature.
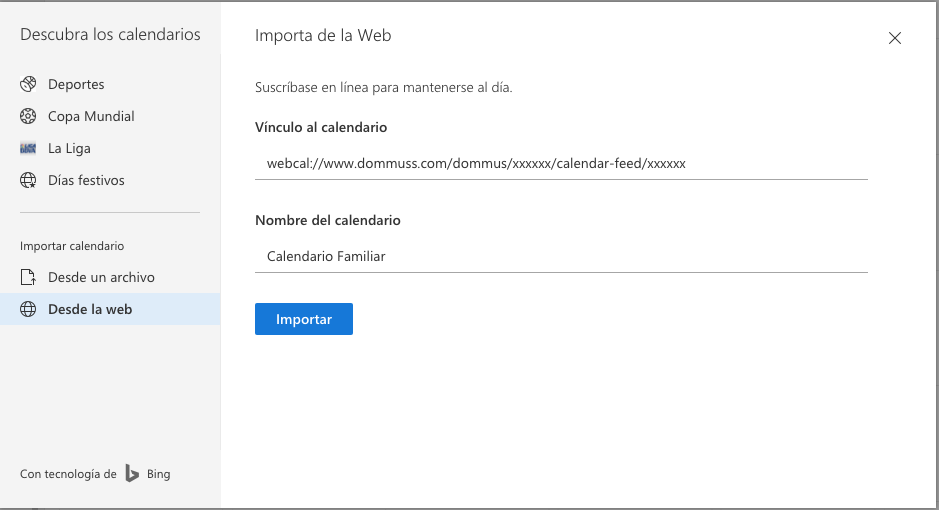
Note: For Outlook policies, it can take up to 12/24 hours for changes to take effect in your calendar.
For the MICROSOFT OUTLOOK PROGRAM:
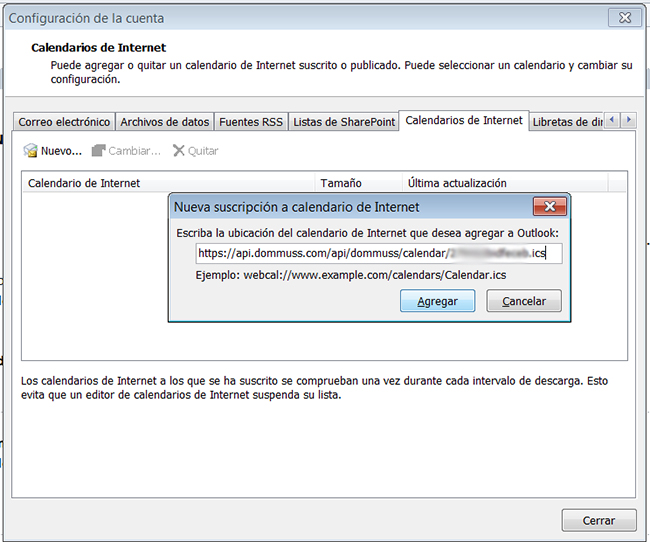
Note: Outlook should update the calendar every time you enter outlook.
Yes, as long as you are a PLUS user.
For example, you could register the dommuss for your family with your wife/husband and children but, in turn, be a guest at another Dommuss with your parents and siblings.
You could also join the dommuss of your work group or university, create a Dommuss to share with the football team you play on Sundays or with your music group.
As indicated in the previous section, you can only belong to or have more than one Dommuss if you are a PLUS user.
Registering a new Dommuss (for your work group, your football group, your parents and siblings, etc) is very easy. Click on the icon on the right side menu.
Click on the "Create Dommuss" button and you will only have to choose the name and photo as when you created your first Dommuss.
If you belong to several dommuss, to switch from one to the other you have to press the upper right icon to display the left side menu.
Once the left side menu is displayed, you will see the "my Dommuss" section which includes the Dommuss you belong to.
The Dommuss marked with a tick is where you are at the moment. If you want to go to another one, just click on the one you want to see.
It's only two steps: On the main screen of the dommuss, tap on the Settings icon next to the picture to access the options of that Dommuss.
In the menu that opens, from the dommuss settings, click on the button that appears at the end "Delete dommuss".
To customize the notifications, from the main page of the dommuss, click on the upper left icon.
Once the left side menu is displayed, click on "Settings".
You can choose between two types of notifications:
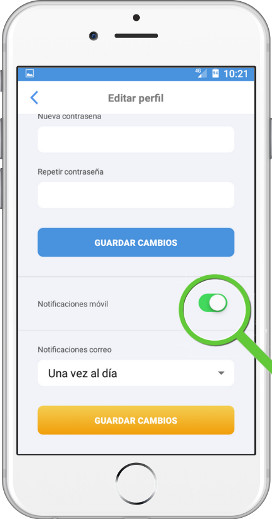
Just click on the "Save" button and start receiving the notifications.
To close the application and exit dommuss, click on the upper left icon to access the left side menu.
Once the left side menu is displayed, click on "Close Session".
Press the upper left icon to display the left side menu.
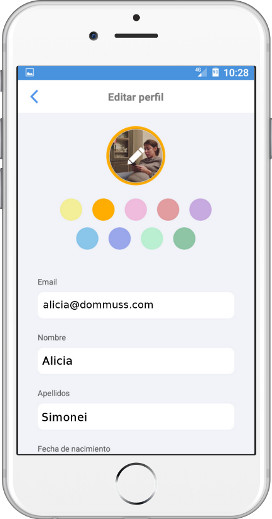
In this menu, click on your profile picture.
You will see that the first field is the e-mail field. Simply modify it and save the changes.
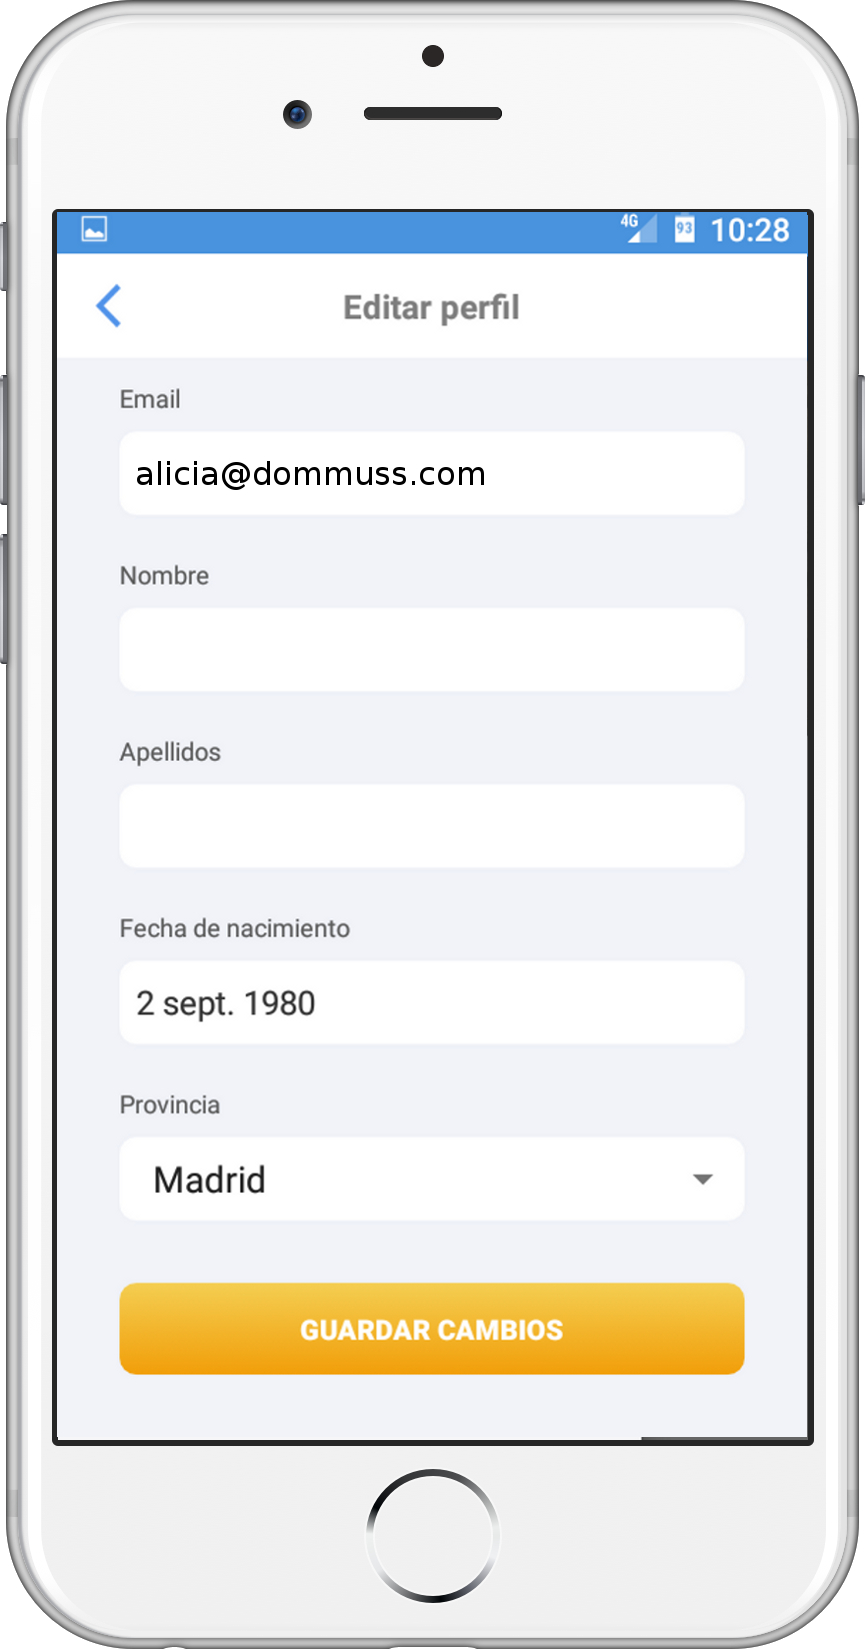
Press the upper left icon to display the left side menu.
In this menu, click on the Settings section.
In the first section, enter your current password and the new password you want to include twice. Save the changes and you're done.
Remember that to make the password more secure it must contain at least 8 characters, with upper and lower case letters and at least one number.
If you don't remember your password, don't worry, you can retrieve it.
On the login screen, click "I am registered".
Once inside, click on the blue "Forgot your password" link below the email and password fields.
You will be asked to enter the email address you are registered with and an email will be sent to you so that you can change your password.
Press the upper left icon to display the left side menu.
In this menu, click on your profile picture.
Make any changes you consider appropriate and click "Save changes".
